The Damsel made her first batch of salsa for the year today. There’ll be more.
The Damsel would like to inform you that canning salsa isn’t tricky. The skill level is similar to boiling water. But it ain’t for sissies, either. It takes a while. There’s a good bit of working on your feet, and there’s the heat.
On the good side . . . (pause while the Damsel tries to think of a good side) . . . she only saw one bug during the entire process, and it was a dead spider in the bottom of an empty canning jar. It could have been much worse. There could have been earwigs. It was a completely earwigless day.
And of course there was another good side . . . yummy salsa was made and put away for a winter’s day.
In order to can salsa safely, you have to follow strict recipes and directions. That’s because salsa contains both acid vegetables (tomatoes) and non-acid vegetables (onions and peppers). The balance of acid has to be high enough for it to be safe to do waterbath canning. But the Damsel can’t be bothered with all that. She wants to make salsa her own way, so it tastes the way she likes. And when you pressure can, you don’t have to worry or measure or any of that tedious stuff. When you pressure can your own custom mixtures, you can be safe by figuring out which vegetable in your mixture requires the longest processing time, and then use that time.
But the Damsel is getting way ahead of herself.

First, get the goods. The Damsel stretched forth her hand to her sprog, who went forth to the cottage garden and brought back Roma tomatoes, onions, bell peppers, and a handful of hot peppers.
 Here’s how to skin the tomatoes: Heat a large pot of water to boiling. Drop in the washed tomatoes. You can use regular or Roma. “Blanch” them for a minute or two and when their skins split, remove them from the water to cool a bit. Don’t worry if some tomatoes don’t show a split. If most of the tomatoes in the pot have, the rest are ready as well.
 See the split? Now the skins will slip right off. Just nip off the stem with a little knife and poof.
 Now the Damsel would like to introduce you to her pet, otherwise known as her grandmother’s grinder. It’s very old school. You put stuff in the top, turn the crank, and perfectly diced things come out. Not like some food processors, that end up pureeing the bottom layer and haphazardly chopping the top layer. Perfect. Perfect. Every time. It can never break, it doesn’t need electricity, and it doesn’t have a million weird little parts to wash. Plus it’s fun to turn the crank. The Damsel has known sprog to fight over the chance.

The Damsel loves her pet, and encourages you to adopt one of your own at your first convenience. As far as she knows, you can only buy them at yard sales.
Dice up your tomatoes, onions, and bell peppers in whatever way seemeth you best if you don’t have a pet. Put it all into a large pot. Add chopped cilantro and garlic, if you know what’s best, plus a lot of salt and pepper. Add some chopped hot peppers, like jalapenos, if you like the heat.
Notice the Damsel hasn’t said how much of anything? She just puts stuff in until it has the balance of red, green, and white that she likes. Taste, taste, taste, and adjust. Taste some more. She guesses the end result if probably 75% tomato, 12% onion, 12% pepper, or something like that.
 Oh heaven on a chip.
When it’s just right, ladle into canning jars and assemble the two piece lid/ring, screwing the ring on finger-tight.

The Damsel uses pint jars for salsa. Put 3 or 4 inches of water in the bottom of the pressure canner, along with the rack, and heat to boiling. Put in the jars…as many as will fit. Nine pints fit in the Damsel’s ridiculously big pressure canner. Put on the canner lid tight, and let it start to steam. When a plume of steam is escaping from the vent, set the timer for 10 minutes. Then put on the petcock and pressure will start to build inside the canner. When it reaches 10 lbs. pressure (or whatever pressure you’ve been recommended to use in your area) begin counting processing time. Let the canner cool on its own, then remove the jars and CAREFULLY retighten any jar rings that are very loose.
 Here they are, the little beauties. Wait 24 hours and check the seal. If the middle of the lid bops up and down, it didn’t seal, and needs to be refrigerated or reprocessed.
Oh, the delights that now await you! Who can wait for winter?




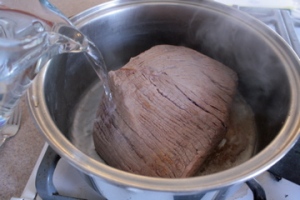
 Plop the roast, fat side down, into the hot pan. It will seem like a strange thing to do, but everything will be okay in the end. After a minute or two, stab it with a fork in order to turn it. Brown it on all sides, or until you’re tired of it.

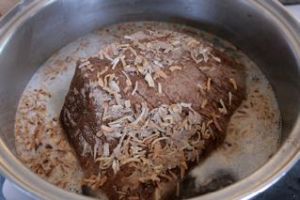 Sprinkle it both on top of the meat and around it in the water.
 Then put them, as is, into a ziplock freezer bag. After they freeze, they’ll be like cold, hard balls. Or cold, hard oval-shaped thingies if they are Romas.
 To use them, you can put them in a strainer like so and let them thaw. Or just put them in a bowl. A LOT of liquid comes off these babies. When they are thawed (or even partially thawed) the skins will slip right off. That’s right. Just by freezing them, the skins will slip. No blanching necessary! The Damsel loves this so, so much.
 Wash the tomatoes well and then slice. Some people peel them first but the fancy kind you buy in the store aren’t peeled, so why should you?
 But, if you want the look of the sun-dried tomatoes you buy at the store, just cut the tomatoes in half lengthwise like so. (Large beefsteak tomatoes need to be cut more than just in half, or you’ll wait a very long time for them to dry.)
 Cut a shallow slit on the skin side. Goodness! Be careful!
 Arrange the tomatoes on the dehydrator screen (or cookie sheet if you’re doing them in the oven) cut side up, and sprinkle with salt, if you like. The Damsel likes.
 So, get it set up with your hotness of choice. Walk away. It takes a while. The Damsel hates waiting, but there’s nothing for it. After a couple of DAYS the tomatoes look like this. They are done when they are still pliable, but no moisture remains. If you tear one in half, you should see no beads of moisture along the tear. Check them every few hours…take the smaller pieces out as they dry. The circular cuts may dry in only one day.
 The dried tomatoes can be stored in glass, ziplocks, etc. Just something that will keep them cool and dry.
 The pears in this picture are all “green,” even the one on top, which got a “suntan” so it has a rosy spot. Despite this the pears are all pretty darn hard.

 Here’s how to skin the tomatoes: Heat a large pot of water to boiling. Drop in the washed tomatoes. You can use regular or Roma. “Blanch” them for a minute or two and when their skins split, remove them from the water to cool a bit. Don’t worry if some tomatoes don’t show a split. If most of the tomatoes in the pot have, the rest are ready as well.
 See the split? Now the skins will slip right off. Just nip off the stem with a little knife and poof.
 Now the Damsel would like to introduce you to her pet, otherwise known as her grandmother’s grinder. It’s very old school. You put stuff in the top, turn the crank, and perfectly diced things come out. Not like some food processors, that end up pureeing the bottom layer and haphazardly chopping the top layer. Perfect. Perfect. Every time. It can never break, it doesn’t need electricity, and it doesn’t have a million weird little parts to wash. Plus it’s fun to turn the crank. The Damsel has known sprog to fight over the chance.
 Oh heaven on a chip.
 Here they are, the little beauties. Wait 24 hours and check the seal. If the middle of the lid bops up and down, it didn’t seal, and needs to be refrigerated or reprocessed.